An issue that comes up every so often when dealing with Meyer’s longsword is “stance”- how wide should you be? This is a contentious issue, with different groups advocating a permanently wide stance, or a variably wide stance. At the same time, people argue about the feet alignment, the weighting of the stance, and so. Being both a devout Meyeresque longswordist and a data scientist, about 8 years ago I attempted a more scientific analysis of Meyer’s longsword plates. The results were not widely distributed, so I decided that a blog post on my observations would be a good conversation starter. It’s a bit geeky, but that’s what I do.
Methodology
Our only real indications of Meyer’s stances and movement comes from the longsword plates in his book. Thus, if we want to work out how wide a stance he uses, then we need to attack the plates. First and foremost, we need to assume that Meyer’s figures are copied from life and reflect normal human proportions (more on this later). Secondly, the image should not have had its proportions altered digitally or during scanning. I’ve used copies of the images, so there is a risk that the aspect ratio has changed, but that should not affect what is measured here.
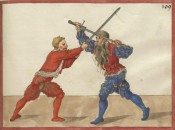
For a reference to how wide the stances are, I used the length of the feet in the images as an internal reference, as shown in Figure 1. There’s a certain amount of inaccuracy here, as the feet are often at angles to the viewer, but it allows a decent estimate of stance length to be made.
Figure 1: Meyer’s plate E, with estimates of stance width based on foot length.
Besides measuring the stance width, I also looked at the orientation of the feet, classifying foot position as follows:
- Backward= pointing backwards, as in the figure on the right in the foreground of Figure 1
- Forwards= pointing straight forwards
- Outwards= Angled relative to the line of motion, as in the back foot of the lefthand forefront figure in Figure 1
Often foot position is recorded as “Unclear” or “Not on Floor”, for obvious reasons.
Other information recorded includes the angle of the back (forward leaning, straight or back), and whether the knee is over the toes or not.
Results (see the table below for details)
The stance width data shows three groupings: 2 (45%), 2.5 (8%) and 3 (35%) foot lengths between the feet, with 12% of the figures unclear. This would indicate relatively long stances, but not extreme. Foot alignment data shows that the front foot is generally straight, but the rear foot is often inclined outwards. Generally the back is tilted forwards. Importantly, the knee alignment data indicates very strongly that if the stance is wide (3 foot length), the toes are ahead of the knees, whereas when the stance is narrower, the knee is above the toe.
Discussion
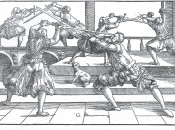
At first glance, the data suggests a relatively wide stance for Meyer’s longsword, but there are a lot of subtleties. Importantly, the knee-toe alignment brings to mind Capoferro’s image of the lunge:
 Figure 2: Capoferro’s lunge
Note the inclined rear foot, the knees over the toes, the forward leaning torso- and the distance between the feet. Capoferro’s text implies us that the lunge is about 2 foot lengths apart (stepping one foot length forward when the feet are initially one in front of the other). This stance is very reminiscent of the first grouping of 2 foot lengths in the Meyer plates. Now, as rapier aficionados will tell you, the lunge is not a position you stay in very long- you land in that position and move on.
If the 2-foot length stances are lunge-like, the 3-foot stances are steps in motion. Basically, in order to have your toes in front of your knees, you either need to have a back-weighted stance (e.g. Figure 3), or you are in the process of stepping forward. Since Meyer’s fighters have their back leaning forward and a long stance, I’d argue that the 3-foot grouping indicates the fighter is busy stepping forward at that point.
 Figure 3: Capoferro’s backwards leaning stance: not what we see in Meyer’s plates
Thus, I’d argue that my stance analysis shows that Meyer’s plates generally show either figures in a lunge after delivering a blow, or figures stepping forward to deliver a blow. What does not appear to be shown in the longsword is the regular stance, which I’d argue is much more likely to be the saem as some of the stances shown in Meyer’s dussack than the overly long stances many practitioners favour.
In conclusion, I’d argue that Meyer makes use of lunges and lunging steps in his longsword play, rather than standing in a wide stance all the time. In my opinion, a forward-leaning, wide stance limits your movement speed, whereas a narrower stance which can be expanded into a lunge is more useful. Similarly, being able to retract from a lunge to a narrower stance is a valuable asset. In essence, I believe that Meyer’s plates show the termination of moves, not the start.
Aside: Meyer’s proportions
Many Renaissance artists modelled their figures to match certain proportions. Even though Meyer’s fighters are probably drawn from life, the artist is likely to have checked the proportions of each image against an ideal. One way to check this is to measure the height of the figure relative to the foot length. Though it takes some wangling, it appears that Meyer’s figures are about 5 and a bit times the foot length shown. Analysis of modern human foot-height ratios puts this at the low range (http://www.statcrunch.com/5.0/viewreport.php?reportid=30241) of the human norm, with 6-7 times foot length the norm. Correcting for this, the distance between the feet of Meyer’s fighters would decrease slightly, but not significantly.
Data:
File of analysed figures: stances 1
Tabulated:
| Plate | Figure | Space between feet | Knee before toes? | Back Foot Alignment | Front Foot Alignment | Angle of Back |
| E | Figure Left Back Right | 0 | Unclear | Unclear | Unclear | Forwards |
| F | Figure Left Back Right | 0 | Unclear | Unclear | Unclear | Forwards |
| F | Figure Right Back Left | 0 | Unclear | Unclear | Unclear | Forwards |
| H | Figure Right Back Left | 0 | Unclear | Unclear | Unclear | Forwards |
| H | Figure Right Back Right | 0 | Unclear | Unclear | Unclear | Backwards |
| M | Figure Left Back Left | 0 | Unclear | Unclear | Unclear | Forwards |
| N | Figure Left Back Right | 0 | Unclear | Unclear | Unclear | Forwards |
| N | Figure Middle Left | 0 | Unclear | Unclear | Unclear | Unclear |
| N | Figure Middle Right | 0 | Unclear | Unclear | Unclear | Unclear |
| O | Figure Middle Left | 0 | Unclear | Unclear | Unclear | Unclear |
| O | Figure Middle Right | 0 | Unclear | Unclear | Unclear | Unclear |
| O | Figure Front Right | 2 | Yes | Forwards | Straight | Forwards |
| D | Figure Right Back Right | 2 | No | Outwards | Unclear | Forwards |
| H | Figure Front Right | 2 | No | Outwards | Straight | Backwards |
| I | Figure Front Left | 2 | No | Outwards | Straight | Forwards |
| C | Figure Middle Left | 2 | Unclear | Outwards | Straight | Unclear |
| E | Figure Right Back Right | 2 | Unclear | Outwards | Straight | Unclear |
| G | Figure Front Left | 2 | Unclear | Outwards | Straight | Straight |
| I | Figure Left Back Left | 2 | Unclear | Outwards | Straight | Backwards |
| I | Figure Right Back Left | 2 | Unclear | Outwards | Unclear | Forwards |
| I | Figure Right Back Right | 2 | Unclear | Outwards | Unclear | Forwards |
| B | Figure Front Right | 2 | Yes | Outwards | Straight | Forwards |
| B | Figure Left Back Left | 2 | Yes | Outwards | Outwards | Forwards |
| B | Figure Right Back Right | 2 | Yes | Outwards | Straight | Straight |
| D | Figure Front Right | 2 | Yes | Outwards | Straight | Forwards |
| D | Figure Middle Right | 2 | Yes | Outwards | Straight | Forwards |
| F | Figure Front Left | 2 | Yes | Outwards | Straight | Forwards |
| F | Figure Front Right | 2 | Yes | Outwards | Straight | Forwards |
| G | Figure Front Right | 2 | Yes | Outwards | Straight | Forwards |
| H | Figure Front Left | 2 | Yes | Outwards | Straight | Forwards |
| I | Figure Front Right | 2 | Yes | Outwards | Straight | Forwards |
| I | Figure Left Back Right | 2 | Yes | Outwards | Straight | Forwards |
| K | Figure Back Right | 2 | Yes | Outwards | Unclear | Backwards |
| K | Figure Front Right | 2 | Yes | Outwards | Straight | Forwards |
| L | Figure Right Back Left | 2 | Yes | Outwards | Unclear | Forwards |
| M | Figure Front Left | 2 | Yes | Outwards | Straight | Forwards |
| M | Figure Front Right | 2 | Yes | Outwards | Straight | Forwards |
| O | Figure Front Left | 2 | Yes | Outwards | Straight | Forwards |
| B | Figure Right Back Left | 2 | Yes | Straight | Unclear | Forwards |
| F | Figure Middle Right | 2 | No | Unclear | Outwards | Forwards |
| F | Figure Right Back Right | 2 | Unclear | Unclear | Unclear | Backwards |
| B | Figure Left Back Right | 2 | Yes | Unclear | Straight | Forwards |
| B | Figure Middle Right | 2 | Yes | Unclear | Straight | Forwards |
| C | Figure Left Back Right | 2 | Yes | Unclear | Straight | Forwards |
| D | Figure Right Back Left | 2 | Yes | Unclear | Unclear | Forwards |
| E | Figure Left Back Left | 2 | Yes | Unclear | Straight | Forwards |
| F | Figure Left Back Left | 2 | Yes | Unclear | Straight | Forwards |
| F | Figure Middle Left | 2 | Yes | Unclear | Straight | Forwards |
| G | Figure Left Back Left | 2 | Yes | Unclear | Unclear | Forwards |
| G | Figure Left Back Right | 2 | Yes | Unclear | Straight | Forwards |
| G | Figure Right Back Right | 2 | Yes | Unclear | Straight | Forwards |
| H | Figure Left Back Left | 2 | Yes | Unclear | Unclear | Forwards |
| H | Figure Left Back Right | 2 | Yes | Unclear | Straight | Forwards |
| M | Figure Middle Right | 2 | Yes | Unclear | Straight | Forwards |
| O | Figure Left Back Right | 2 | Yes | Unclear | Straight | Forwards |
| A | Figure Front Right | 2.5 | No | Outwards | Straight | Forwards |
| C | Figure Front Left | 2.5 | No | Outwards | Straight | Forwards |
| C | Figure Left Back Left | 2.5 | No | Outwards | Straight | Forwards |
| G | Figure Right Back Left | 2.5 | No | Outwards | Straight | Forwards |
| N | Figure Front Right | 2.5 | No | Outwards | Outwards | Forwards |
| K | Figure Front Left | 2.5 | Yes | Outwards | Straight | Forwards |
| B | Figure Middle Left | 2.5 | No | Unclear | Straight | Forwards |
| C | Figure Middle Right | 2.5 | No | Unclear | Unclear | Forwards |
| E | Figure Front Left | 3 | No | Backwards | Straight | Backwards |
| L | Figure Front Right | 3 | No | Not on Floor | Straight | Forwards |
| M | Figure Right Back Right | 3 | No | Not on Floor | Straight | Backwards |
| N | Figure Left Back Left | 3 | Unclear | Not on Floor | Unclear | Forwards |
| L | Figure Middle Left | 3 | Yes | Not on Floor | Straight | Forwards |
| C | Figure Front Right | 3 | No | Outwards | Straight | Forwards |
| D | Figure Front Left | 3 | No | Outwards | Outwards | Forwards |
| E | Figure Front Right | 3 | No | Outwards | Outwards | Backwards |
| E | Figure Right Back Left | 3 | No | Outwards | Straight | Forwards |
| K | Figure Back Left | 3 | No | Outwards | Unclear | Forwards |
| K | Figure Middle Left | 3 | No | Outwards | Straight | Backwards |
| L | Figure Middle Right | 3 | No | Outwards | Not on floor | Forwards |
| L | Figure Right Back Right | 3 | No | Outwards | Straight | Forwards |
| N | Figure Front Left | 3 | No | Outwards | Straight | Forwards |
| N | Figure Right Back Right | 3 | No | Outwards | Straight | Forwards |
| B | Figure Front Left | 3 | Unclear | Outwards | Outwards | Straight |
| K | Figure Middle Right | 3 | Yes | Outwards | Outwards | Forwards |
| D | Figure Middle Left | 3 | No | Straight | Straight | Forwards |
| A | Figure Front Left | 3 | No | Unclear | Outwards | Backwards |
| C | Figure Right Back Left | 3 | No | Unclear | Outwards | Forwards |
| C | Figure Right Back Right | 3 | No | Unclear | Outwards | Forwards |
| E | Figure Middle Left | 3 | No | Unclear | Straight | Forwards |
| E | Figure Middle Right | 3 | No | Unclear | Straight | Backwards |
| L | Figure Front Left | 3 | No | Unclear | Straight | Forwards |
| L | Figure Left Back Left | 3 | No | Unclear | Unclear | Forwards |
| L | Figure Left Back Right | 3 | No | Unclear | Straight | Forwards |
| M | Figure Left Back Right | 3 | No | Unclear | Unclear | Forwards |
| M | Figure Middle Left | 3 | No | Unclear | Unclear | Forwards |
| M | Figure Right Back Left | 3 | No | Unclear | Straight | Forwards |
| N | Figure Right Back Left | 3 | No | Unclear | Unclear | Forwards |
| O | Figure Left Back Left | 3 | No | Unclear | Straight | Forwards |
| O | Figure Right Back Left | 3 | No | Unclear | Straight | Forwards |
| O | Figure Right Back Right | 3 | No | Unclear | Straight | Forwards |